The Dungeons of Ultima VI are devilishly complicated mazes, where it is hard to find the right ladder down. Therefore here a solution to this complicated part of the adventure
Dungeons[]
Deceit[]
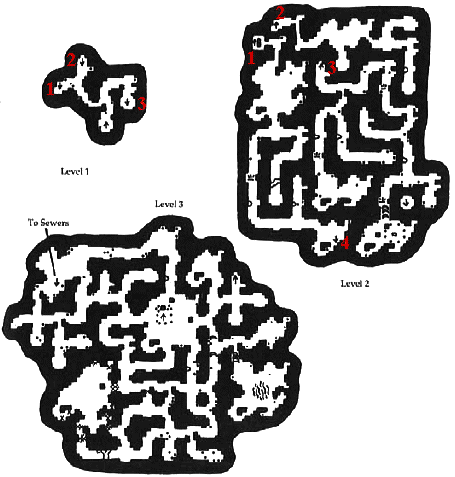
Deceit in Ultima VI
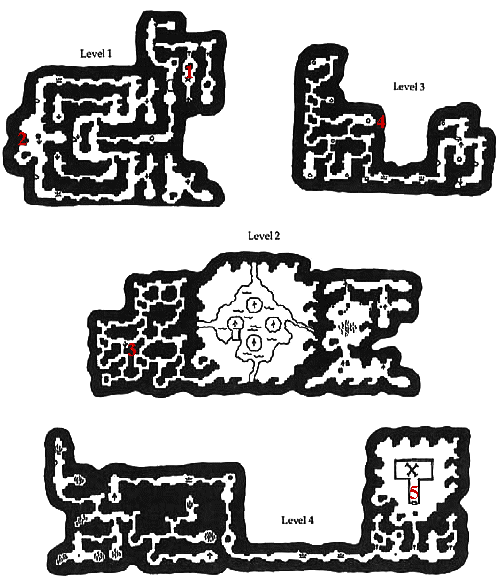
It is absolutely not needed to enter Deceit. It actually is even recommended to NOT enter it, as little of worth is found in it. On the fourth level is a dead mage with powerful loot, but the way there is difficult and so resource-intensive, that it is not worth the bother.
Despise[]
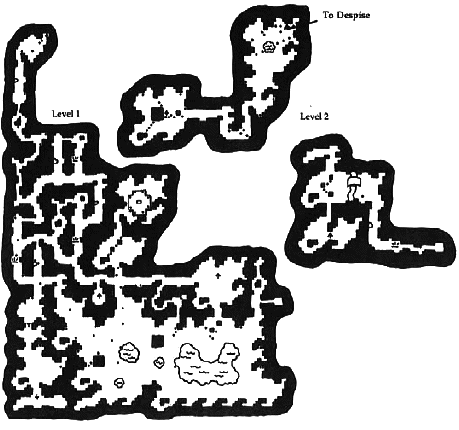
Despise in Ultima VI
While it is not needed to enter Despise, the dungeon isn't too complicated and has good loot.
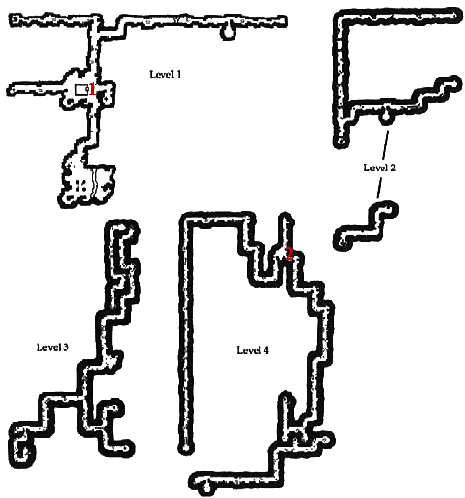
Right from the start it is possible to descend the ladder at 1 to enter Heroes' Hole, an expert dungeon. Descending the ladder 2 gives access to the rest of Deceit. The ladder 3 leads to the other half of level one, while the ladder 4 leads to level three.
One level three, note the treasure locations on the map. Using a skiff to access ladder 5 in the middle of the lake enables access to the second half of level two, with lots of treasure.
Destard[]
Destard in Ultima VI
It is absolutely needed to enter Destard in order to get Dragon Eggs for Sandy in Trinsic. The Dragons are horrible enemies, spells like "Kill" are needed to survive this dungeon.
Right from the start, move east to access the ladder 1 to level two in the middle of the big hall. On level two move west and right down the hole 2 to level three. On level three, take the ladder marked 3 that is in the west to get down to level four.
Be warned, many dragons are here. Make your way to the breeding chamber 4 to get the eggs and loot. Then proceed, if possible, to the treasure chamber at 5 to get more loot.
Wrong/Covetous[]
Wrong/Covetous in Ultima VI
Wrong and Covetous are one dungeon. Not many enemies, and the main goal is to find the lost map piece of Heftimus McPry. Wrong entrance is at 1, Covetous entrance at 2.
Right from the start, take one of the cauldrons at 5, since it is needed for the Hot-Air Balloon. Descend quickly following the map, until you are in level three. Enter the upper eastern room and search for a secret door, then follow the corridor to room 3 with a Swamp Plant. The map piece is found there.
Also, descending the ladder at 4 goes to a cave with meager treasure.
Shame[]

Shame in Ultima VI
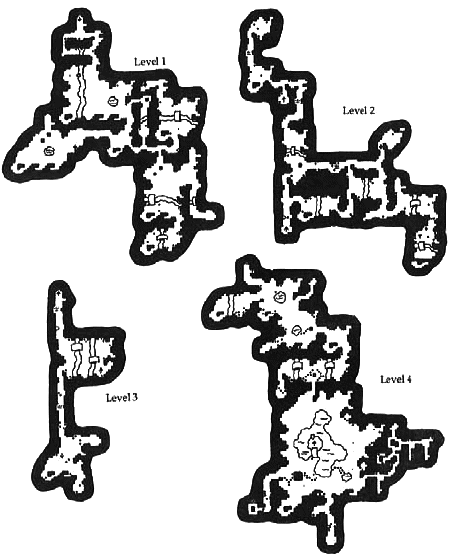
Entering Shame is needed to find Old Ybarra, who has a crucial map piece. Shame is less of a labyrinth and more of an annoyance when backtracking is needed, since Shame consists of two independent parts, joined at level one. Also, in Shame the chance to dig up gold nuggets is the biggest in all dungeons.
From the start, kill the Skeletons in the shed, then plunder it. Then try to find the correct ladder that leads into the bigger part of level four. There you'll find Old Ybarra at 2 and he will release the map piece for some food.
Hythloth[]

Hythloth in Ultima VI
Hythloth is the only way to the Realm of the Gargoyles, thus you have to enter it. The dungeon is infested with Daemons and Dragons, making it the hardest in the game. Strong spells and the Storm Cloak are a must to survive this horror. Also, you have to walk through lava, which isn't healthy as well.
On the first level, you must reach the ladder 1 in the north-western part of the level. On level two, the ladder in the lava in the middle of the big hall looks obvious, but is fake. Instead take the southern ladder at 2. On level three follow the long corridor and then go the eastern corridor south to reach the ladder 3 to level four.
Reach the south-western part of level four to find Captain Johne at 4. Talk with him, learn the language of the Gargoyles, then descend the ladder at 5 to enter the Realm of the Gargoyles.
Caves[]
Note that smaller and/or hard to reach caves are not included here.
Ant Mound[]

Ant Mound Map
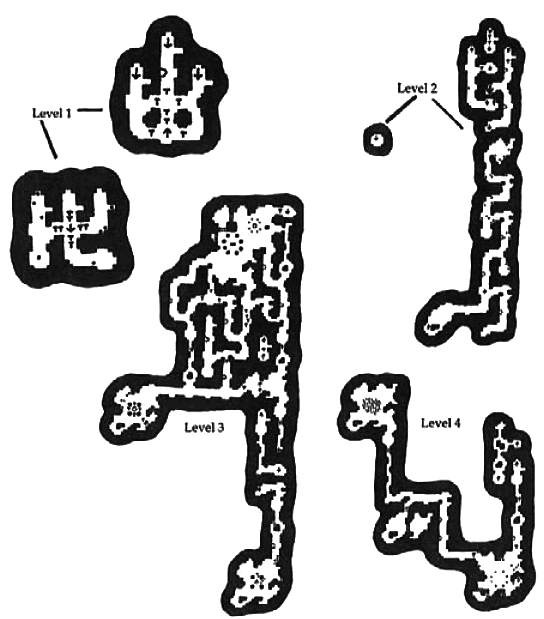
It is needed to enter the Ant Mound in order to find the map piece of Ol' Hawknose. Needless to say, the cave is infested with Giant Ants.
On the first level, go north-west to the hole at 1 in the big hall, to descend to level two. There, go north-east to the hole at 2 to descend to level three. On this level, go to the south-west to find the hole at 3 to enter the final level. Go to the chamber of the ant queen at 4 but don't kill her (karama loss otherwise). Only kill the guards and then find Ol' Hawknose's body with the map on it.
Buccaneer's Cave[]
Buccaneer's Cave Map
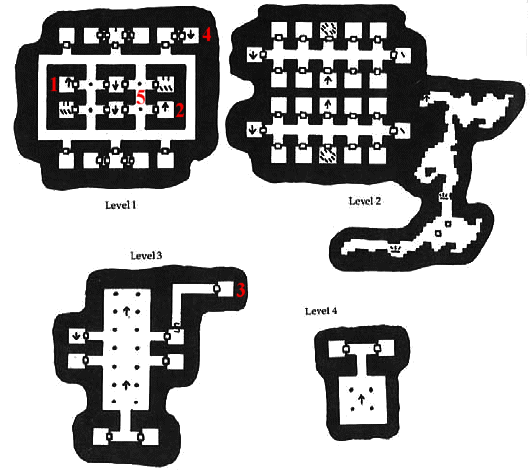
There is no reason to actually enter this cave, apart from loot and a way to the sewers.
On the first level, the ladders 1, 2 and 3 lead to different parts of level two. 3 leads to loot, while 1 leads to the ladder 4 that leads to level three. On level three, find the ladder in the north-west to enter the sewers.
Heroes' Hole[]
Heroes' Hole Map
The Heroes' Hole is an expert dungeon with no actual story relevance. It can be entered from Despise or from its regular entrance. Using the map it should be very easy to loot the entire place of everything worth of taking. Also, the monsters in this place are rather strong.
Pirate Cave[]
Pirate Cave Map
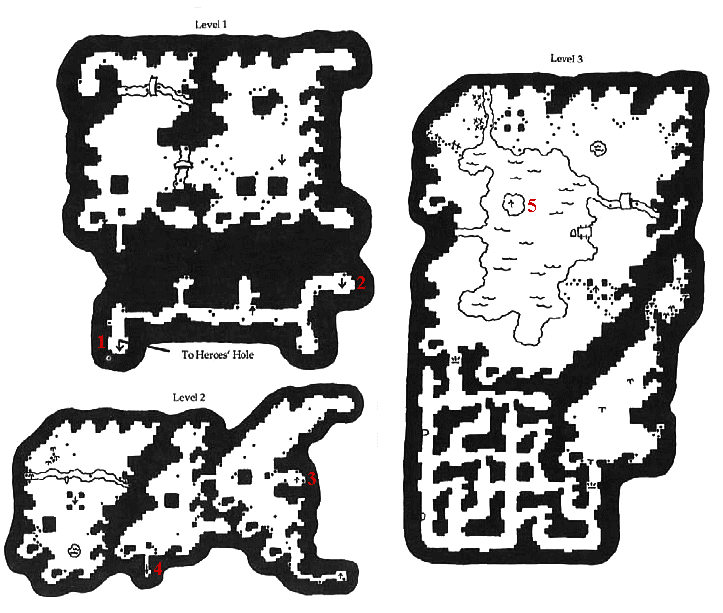
You need to enter the Pirate Cave in order to reach the treasure of Captain Hawkins and the second half of the Silver Tablet. The main problem are traps.
Right of the start, dig up Captain Hawkins' grave at 1 to get good loot. Then go to the westernmost ladder at 2, which leads to level two. On level two, ignore all the signs in the western labyrinth and find the ladder at 3, which leads to level three. There, take the hole marked 4, as it is the only safe one (you can recognise it by a gold nugget lying beside it).
On level four, go all the way to the east to the treasure chamber at 5 and blow up the door with a powder keg. Take the Silver Tablet half, the Storm Cloak and the Magic Fan. The rest is optional.
Sewers[]

Sewers Map
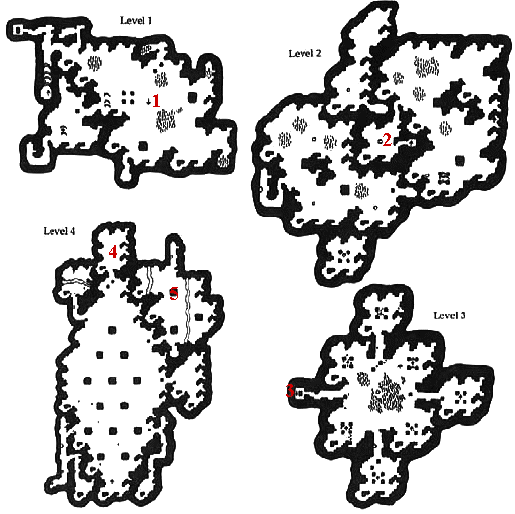
You need to enter the sewers in order to find Phoenix and take her belt. Also, the sewers connect to the Buccaneer's Cave.
Once you are on level one, you can find Daros at 1 and have a chat with him. Once this is done, take any of the ladders down to level two. There, find the ladder 2 which leads to level three. You find Phoenix in the northern part at 3. but first remove the traps with "Vanish", then steal her belt with "Pickpocket".
Also, finding the ladder on the island at 4 leads to the Buccaneer's Cave.
Swamp Cave[]

Swamp Cave Map
The Swamp Cave is not needed for the main quest. However, apart from some annoying monsters, it is an easy dungeon with no false leads. Care should be taken to reach the bottom, since a mage had died there with lots of good stuff, including a Storm Cloak.